Wednesday, May 18, 2016

Working It Wednesday: Watercolor Pencils

This week I played around with watercolor pencils for the first time. Until recently, I'd never even heard of them and had no idea such a thing existed. They're kinda cool in that you can use them dry just like regular colored pencils or you can wet them and they turn into watercolor paint. There are different ways to get the wet effect. You can dip the pencil tip directly into the water and then color on the paper or you can color dry on the paper and then brush water over the paper. I tried the second, using a paintbrush to spread water over the paper.


Here's a step by step of what I did:

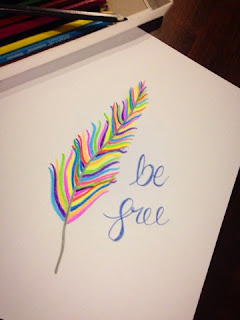
I started by sketching out my picture. I used watercolor paper and dry watercolor pencils. The pencils genuinely feel like plain old regular colored pencils when you use them dry.


Once my feather was sketched out, I added a short quote.


Then came the fun part! I took a clean watercolor paintbrush and carefully brushed water over the paper. You have to be extra careful on this step because using too much water will smear all your colors together. Sometimes this could create a nice effect but in this particular case, I didn't want all my feather colors blending together so I tried to use my water sparingly. On the short quote part I used the water a little more liberally and you can see in the picture below how the color spread nicely across the paper. 

As a final touch I took an extra fine sharpie pen and went over the lettering and the stem of the feather to make the detail pop a little more. Here is how the finished project turned out:


All said, I liked how the lettering turned out with both the pencils and the sharpie. I think this would be a great technique for me to make some greeting cards with. I will need more practice playing around with the pencils and water on the multi-colored pictures. Not over watering the colors and blending them together definetly takes practice. In the meantime, I may take a few quotes and paint them/color them onto blank greeting cards and list them in my Etsy shop. You can watch for them to appear in the shop here: www.wishesandwonderment.etsy.com


Wednesday, May 11, 2016

Working It Wednesday: Just For Me

This week I've been working on a little something just for me! Several years ago I took some sharpies and wrote all over a canvas some of the cool things I've gotten to experience in my life. It wasn't anything fancy but I've always liked looking at it, thinking back over fun times.

Since I created it, I've done so many more things since then (I've lived in 4 states since then!)  that I decided it was time for me to create a new one. And this time I wanted to make it prettier.

I started by painting a few bright watercolors on a blank canvas.


Once that was dry, I used a sharpie paint pen to put an Oscar Wilde quote in the middle. It's one of my favorites. I could've just used a regular sharpie marker for this but the paint pens have a glossy finish that will make the quote stand out a little more once it's surrounded by a bunch of writing.


Then, I grabbed a sharpie marker and got busy writing my life experiences across the canvas. This is where I messed up by assuming I didn't need to use a ruler. I always need a ruler yet always convince myself that I can freehand without it and still keep my lines straight. In truth I could've used a larger canvas as there were many things I wanted to add but couldn't because I was out of room. I may end up re-doing it on a larger canvas and with the help of a ruler, but for now, I'll just let it hang as it is on my art room wall. So, imperfect as it is with my uphill slanted handwriting, I still like it. For someone like myself who loves taking trips down memory lane, this is just perfect.


Tuesday, May 3, 2016

Working It Wednesday: Mother's Day Gift

This week I've been working on a little gift for my mom for Mother's Day. I'm actually giving it to her today so that's why I'm able to blog about it without ruining the surprise. Awhile back I'd seen a picture of an angel on a greeting card on Pinterest and immediately thought of my mom when I saw it, planning to paint it for her at some point. Well, with Mother's Day around the corner, I figured it was a good time to paint it. 


I began by painting the backdrop of the canvas. This is probably one of my favorite parts of canvas painting. I absolutely love how the paint colors blend together. I used dark brown, tan, emerald green and turquoise to create the background of the 12x12 canvas.


Once the background paint was dry I started working on the angel. The picture that inspired this had a beautiful pale blue on the dress of the angel but I prefer turquoise (and was also out of pale blue paint) so I started with that and then slowly blended in touches of the emerald green, brown and gold.


Once the angel itself was dry, I painted a clear gloss finish over the whole thing. This is something I just started doing in the past year. It gives the painted canvas a nice, completed feeling and helps the colors stand out better. I'm pleased with how her painting turned out and I'm sure she'll like it!


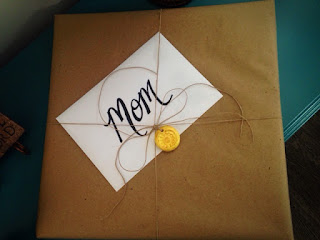
Then I wrapped it up, adding one of my polymer gift tags to the wrapping. I am NOT a present wrapper and am in fact, Queen of the gift bags but canvases always look nicer when wrapped in brown butcher's paper so when I give paintings (or sell them) I usually wrap them. Under normal circumstances though, if you get a gift from me it will either be in a gift bag or not wrapped at all. I'm incredibly terrible at it, ask anyone in my family.

Anyway, I've also been working in my Etsy shop this week, getting things replenished now that I've gotten a few craft fairs out of the way. I'll be adding a few new paintings this week so if you like my work, feel free to check them out here: www.wishesandwonderment.etsy.com